How to create a Professional logo free in 5 minutes


How to create a Professional logo free in 5 minutes

Designing a logo for your business website can be costly ($500 to $5000).

Not only that – a small-budget team may not have the software programs or skills to design a logo on their own. One thing’s certain: a logo design is important. It establishes your brand’s visual identity and stands as a memorable symbol of who you are.

Where do you turn when you don’t have the resources for a professional logo design? Luckily there are tons of free logo makers and generators online and in this article we"ll know some top websites who create free logo as well here we'll know how to create a professional logo by using one website from some top websites.

So, I'm going to show you how you can make a logo for free.After reading this article you'll be able make logos like below by using just your browser.


How to create a Professional logo free in 5 minutes


So, lets get started.

Step 1: Go to logo making tool

So the first step is to 'Go to logo making tool'. So to go there just click this link and it'll take you the below page or write www.thehoth.com in your browser.


How to create a Professional logo free in 5 minutes

So this is where you can design your own logo. Now you can see that a sample logo here so lets remove it by clicking new. 

How to create a Professional logo free in 5 minutes


After clicking on the new option a popup window will show and in this popup window click on the yes button.

How to create a Professional logo free in 5 minutes

After clicking on yes button the page will be blank.

How to create a Professional logo free in 5 minutes

So now we have a blank page where we can start creating our logo.So to create our logo let's go to step two which is 'to make the icon of our logo'.   

Step 2: To make the icon of our logo
 
 So to make the icon just click add symbol and you'll find different icons and it's categories.

How to create a Professional logo free in 5 minutes

Now choose a category which relates to your brand.I'm going to choose web and then pick an icon you like so I'm going to select this one.


And as soon as you click it, it'll be added to your page.So once you have added your icon next let's see how you can make it more unique so let's say you want to change color of added icon.All you have to do is just  click on the place where you want to change the color and then click here and change the color from here.So now we have changed the color.

How to create a Professional logo free in 5 minutes

Now let's see how you can customize this icon.so let's say you don't want this dollar symbol.To remove it, all you have to do is just select the part you want to remove and then click the eye button and as you can see the part we selected has been removed.So now you know how you can customize your icon.

How to create a Professional logo free in 5 minutes

So next let's see how you can make your icon more unique.So if you want to make your icon unique, you can add another icon and then place it inside the icon.So let's try it.To pick our next icon let's click add symbol and pick your second icon.Now I'm going to place an icon here and then change this color and now you know to change the color.

How to create a Professional logo free in 5 minutes

Step 3: Add your brand

So to add your brand name just click add text and text will be added.Now to enter your brand name just select text and then write your brand name.


How to create a Professional logo free in 5 minutes

Lets suppose my brand name is SURPRISEME.


How to create a Professional logo free in 5 minutes

Now if you want, you can also add your tag line.Click add text again and enter your tagline.Now you can change it's size and if you want to change color click on the text and do same as we do before.So now we have added our brand name and tagline.

How to create a Professional logo free in 5 minutes


Next let's see how you can make your brand name more unique.So to make your brand name more unique just click on your brand name and then click duplicate now remove "Me" part from first SURPRISE text and then remove" SURPRISE" from the duplicate text as you see below.

How to create a Professional logo free in 5 minutes

So now we have separated the brand name into two different parts.Now to make this logo more unique we are going to apply a different font for "Me" part so let's first place"Me" to the first brand text and to apply a new font and choose the one you like and if you want then resize this by dragging and change the font color.

How to create a Professional logo free in 5 minutes


Our logo looks very unique.So now we have created our logo successfully.
So now let's go to the final step which is to download this logo in our computer.So to download the logo just click save and download and then enter your email and click save and continue and now the logo will be sent to your email.So to get it go to our inbox and then open the mail you have received so here you will see an attachment so let's download this file and if you open it, you can see that we have got our logo in different formats.So if we open anyone of these files.You can see that we got our logo.So this is how you can download your logo to your computer.So once you download the logo you can use this logo anywhere you want.Now if you want to use your logo on different backgrounds like below make sure you use the png file.PNG file give you a transparent background for your logo.So next if you want to edit your logo in future just go back to the logo maker and you'll find this link to continue editing your logo.
Below are some other  top websites where yo can create free logo for free.

 Wix logo maker provides the best of both worlds: answer a few simple questions, and it will automatically create a logo template for you. Then you’re free to customize nearly every single aspect based on your personal preference — from colors to font, text, and sizing.

How to create a Professional logo free in 5 minutes
www.canva.com

Canva has been on the free design market for a while now, offering free and paid templates for social media images, flyers, invitations, business cards, and more. In their impressive lineup of templates comes a large variety of free and paid logo options. Start with one of their free templates, and then change the text, colors, fonts, and more to match your brand.

Don’t like what you see? Upload your own graphics, or choose from Canva’s vast library of free elements to add to the logo template with the simple-to-use drag-and-drop feature. Download your design as a PNG, JPG, or PDF. Use the site to create letterheads, business cards, and more using your free logo.

The only downside is that other people can use the same templates, so you might see similar designs floating around online. With a bit of creativity, it doesn’t take much to give these free logo designs your own unique touch and get a professional-looking logo at no cost.


 Tailor Brands is a powerful all-in-one graphic design tool that will help you design a custom and unique logo for your business. The logo creation process is based on a quiz where you need to answer questions about your brand, industry, and preferences. When you complete the quiz, you’ll get your logo done in no time. Tailor Brands will provide you with some alternative options so you can choose what you like the most or customize your logo until you’re happy with it.

More than that, you’ll get ready-to-use graphics for social media and ads. Finally, once you’re done, you can download high-quality, vector, SVG or EPS files that you can use for your website, business cards, or merchandise with full commercial rights included.
 Free Logo Design makes creating your cost-free logo easy. Simply type in your company name, choose from 20 different categories, the application will preview thousands of free logo templates. Make your own custom changes to the color, shape, and font, and download your design free. If you decide later to invest in your logo a bit, you can download a high-resolution version of your logo for $59.
 
  
Like other logo makers on the list, Graphic Springs features a variety of templates to choose from in multiple categories. Enter your business name and tagline, choose your image category, pick your logo, and edit it with ease. Filter your options through new or popular logos.

If you want a bit more creative freedom with your logo design, start with the shapes and symbols, or use them to give your logo a bit of a decorative touch. Though the software is free to use, it costs $19.99 to download your final design as a PNG, SVG, or JPG. However, this comes with unlimited edits and downloads if you choose to make tweaks in the future.

Note:This article is just for those who are not a logo designer and want to a logo for their brand.This article is also those for who has no money for ordering an logo for their brand and want to create a free professional logo.

How to import photos from your camera into Adobe Photoshop.

Here you learn:

how to import photos from your camera into Adobe Photoshop 


how to import photos from your camera into Adobe Photoshop

You can copy images to your computer by connecting your camera or a media card reader to your computer.
  • Use the Get Photos From Camera command in Adobe Bridge to download photos, and to organize, rename, and apply metadata from them.
  • If your camera or the card reader appears as a drive on your computer, copy images directly to your hard disk or into Adobe Bridge.
  • Use the software that came with your camera, Windows Image Acquisition (WIA), or Image Capture (Mac OS). For more information on using Windows Image Acquisition or Image Capture, see your computer documentation.

Import images from a digital camera using WIA (Windows only)

Certain digital cameras import images using Windows Image Acquisition (WIA) support. When you use WIA, Photoshop works with Windows and your digital camera or scanner software to import images directly into Photoshop.
  1. Choose File > Import > WIA Support.
  2. Select a destination in which to save your image files on your computer.
  3. Make sure that Open Acquired Images in Photoshop is selected. If you are importing a large number of images, or if you want to edit the images later, deselect Open Acquired Images.
  4. To save the imported images directly into a folder whose name is the current date, select Unique Subfolder
  5. Click Start.
  6. Select the digital camera from which to import images.
  7. Choose the image or images you want to import:
  • Click the image from the list of thumbnails to import the image.
  • Hold down Shift and click multiple images to import them at the same time.
  • Click Select All to import all available images.
  • Click Get Picture to import the image.
Note: If the name of your camera does not appear in the submenu, verify that the software and drivers were properly installed and that the camera is connected.

How to Convert easily a color image to black and white image?

Here you know how to convert a color image into a black and white image or in gray color in an easy way.


Do the following:

   Click the Adjustments panel.


·              Click the Black & White the icon  in the Adjustments panel.


      When you click the Black & White the icon then Photoshop will apply default grayscale 
     conversion and color slider also will appear. 
                  

     By using color slider adjust the gray tones of specific colors in an image. Drag a slider left to darken or right to lighten the gray tones of an image’s original color.                                           


To adjust a particular color component, select the On-image adjustment tool and then click in the image. Drag left or right to modify the color slider for the predominant color at that location, making it darker or brighter in the image.

Click the Reset button to reset all color sliders to the default grayscale conversion.

Deselect to view the image in its original color mode.
To apply a color tone, select Tint. To fine-tune the tint color, click the color swatch to open the Color Picker


    how to remove the background of an image in Photoshop cc


     Imagine the subject of your photo surrounded by a completely different background—one you’ve designed from the background-up using your imagination.Before you can place your subject into a completely new landscape, you’ll need to remove the background of the original image first. Background removal is a  tricky art  and requires more than just the eraser tool, but you don’t have to be a graphic design whiz to learn the steps in Adobe Photoshop CC.


    how to remove background of an image

    Step 1: Ready Your Tool

    First, open your photo in Adobe Photoshop. To remove the background, select the ‘Quick Selection Tool’ from the tools panel. (Don’t see the ‘Quick Selection Tool?’ It may be nested with the ‘Magic Wand Tool’). The ‘Quick Selection Tool’ is the best tool for basic background removals.

    hoe to remove background image


    Choosing the ‘Quick Selection Tool’ opens a context-sensitive menu at the top of your workspace. Before you begin, select ‘Add to Selection.’ You may need to open the ‘Brush Picker’ and increase or reduce the brush size depending on the size of your photo.


    how to remove background of an image


    Step 2: Remove Background Imagery with a Selection

    With the tool ready, click and drag your mouse on the unwanted background. A group of marching ants, or selection, will appear and grow as you click and drag. Gradually work around your subject adding to the selection as you go.


    how to remove background of an image

    Sometimes, you’ll find that some areas are added to your selection that you don’t want to 
    include. Hold down the ‘Alt’ or ‘Option’ key to toggle the subtraction mode for the tool, and then click and drag your mouse around the background area you wish to remove. Release the ‘Alt’ or ‘Option’ key when you’re ready to add to your selection again. Alternate between the addition and subtraction modes as your work.

    Zoom-in closer to work tougher areas that include both background and subject. Tip: smaller details like shoestrings, aren’t necessary to include. But reducing your brush to 1px can help capture the smallest details.

    Once your subject is completely within a selection, you’re ready to move on.

    Step 3: Refine the Edges

    You finally remove the background of your image now next time to refine your image.Select your object with "Quick Selection Tool" and then click on the "Select and Mask" option in the above menu look at  the following image.

    how to remove background of an image

    First, change the View Mode to ‘On White’ or any option that sharply contrasts with your selection. Doing so will help you see the parts of your edge that need the most help.

    how to remove background of an image

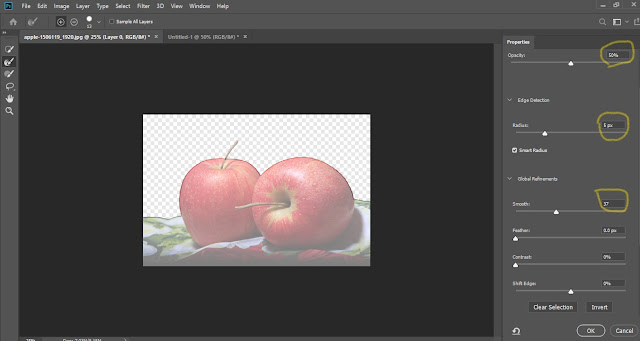
    Under Adjust Edge, increase the Smooth value slider to soften the jagged edges of your selection. You may need to adjust additional sliders but smoothing should help the most. 
                             how to remove background of an image

    Check the Documentation Click OK when finished.                                                                                                   

    how to remove background of an image

    Finally transparent image is ready.                                                                                                                       

    how to remove background of an image

    Removing the background of an image is the first step for compositing success. With the background removed, you’re ready to create a new surrounding for your subject using your own creativity.


    How to Open, Edit & Save images in Photoshop

    how to edit image in Photoshop

    Whether you’re editing an image in Photoshop or creating a text document in Microsoft Word, knowing how to open, edit, and save files is an important part of using any program.

    Learn how to open any image file in Photoshop, make changes, and then save it out as both a PSD (a layered file) and a JPEG (for the web and social media).

    Opening Images in Photoshop

    Most of the time you’ll start a Photoshop project by opening an image. There are a couple ways to do this, so go with the method that fits in best with how you normally like to work on a computer.

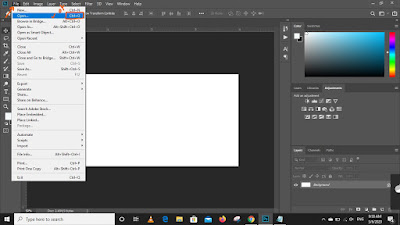
    The first is the standard File Menu route. With Photoshop open, click on File, Open, and then navigate to the folder where your image is saved. This should feel familiar as most other programs use this same method.

    how to open,edit, and save image in photoshop

    Select your specific image and click on open button.


    Your selected image will be open in Photoshop.


    The other option is to drag and drop the images from your Finder or Windows Explorer window onto the Photoshop canvas.

    Once your images are in Photoshop, you have options for how you want them displayed. You can use tabs, which will display each image separately and accessible via tabs near the menu bar (similar to how web browsers display multiple windows). We prefer to avoid using tabs, as we find it’s easier to navigate and move images between projects. You can enable or disable tabs by going to the Photoshop menu, clicking on Preferences, opening the Workspace settings, and checking/unchecking Open Documents as Tabs.

    Editing Images in Photoshop

    With your image open in Photoshop, you’ll notice it now appears in the Layers Panel.


    As a Layer labeled Background. If you opened multiple images, you can get them into the same project by clicking and dragging on the image or the Layer and moving it over the other image.

    Once your photo (or photos) appears in the Layers Panel, the editing magic can begins.But today we just learn basic things.

    Layers are the most important thing to understand as you’re getting familiar with Photoshop. And the number one thing to focus on is developing a non-destructive workflow. What does that mean? Working non-destructively means that you can, at any time, remove or disable edits you’ve made to get back to the original, unaltered photography. And Layers are the primary tool through which we do it.

    Whenever you add to or adjust an image, always work on a new Layer. For some tools this is easy. You create text or a shape, they automatically appear as a new Layer in the Layers Panel.

    But let’s say you wanted to paint over the image with the Brush Tool. Selecting the Brush Tool does not create a new Layer. If you activate the Brush Tool and start painting, you’ll be drawing on (and changing the pixels of) your original image. This is a destructive process! If you were to save it and open it up later, you’ll see the image covered in whatever you painted and you won’t be able to remove it or change it.

    If you first create a new layer on top of the original image. See the below image:


    Now you can paint freely on that Layer and those effects will be totally isolated from the underlying image. That means you can paint, save the PSD, open it later on and be free to change or remove the Brush Strokes as you see fit.

    Saving a PSD
    All this talk of Layers makes it important to note that you should always save a layered file of your work. Photoshop utilizes its own proprietary filetype called a PSD (or Photoshop Document). These special files allow you to open them in Photoshop later, and have complete access to every Layer and edit you’ve made.

    Follow the images for saving PSD file:


    Saving a PSD (or in some cases a TIFF, which is an alternative file type) ensures that you have a backup of your image and all of your hard work!

    Exporting a JPEG
    PSDs and TIFFs save our work, but JPEGs are how we normally share that work on the web and social media. When you export a JPEG, Photoshop ‘flattens’ all of your work into a single layer, while also reducing the file size so it loads faster over an internet connection.

    To export your work as a JPEG, Go to File, Save for Web (Legacy), select JPEG.


    Making sure Convert to sRGB is checked (more on sRGB later).


    This will create an image file that will display your image with great quality and with colors compatible with most web browsers.